Migrating SQL workloads to Microsoft Azure: Assessment and Migration Tools
In the previous articles of this series we discussed how to draw the initial strategy when planning to migrate the SQL workload to
Microsoft Azure, the different database target platforms provided by Microsoft Azure that can be used as a migration
target, based on the workload type, and finally, we went through some tools that help in discovering and assessing
the on-premises environment by identifying the migration blocking issues and providing guidance steps for the
migration process.
In this article, we will go through three new tools that can be used to assess the on-premises databases and
identify any migration blocker, then migrate these databases to Microsoft Azure database service.
Microsoft Data Migration Assistant
The Data Migration Assistant (DMA) tool is used mainly to check the compatibility issues that may affect the
database functionality when migrating your databases to a new SQL Server version or to Azure SQL Database. DMA helps
by identifying any feature in the current version that is not supported in the new version or in the cloud, what new
features in the new version we can benefit from, providing recommendations to enhance the performance and the
reliability in the new version and finally migrate the on-premises version to a newer version or to Azure SQL
Database.
The Data Migration Assistant can be used to assess and migrate any SQL Server installed on Windows machine with
version 2005 and later, to any SQL Server instance installed on Windows or Linux with version 2012 and later or to
Azure SQL Database. DMA tool is recommended as an alternative to the SQL Server Upgrade Advisor tool to assess and
upgrade to the new SQL Server versions. For migrating to Azure SQL Database, it is recommended to use the Azure
Migration Service instead.
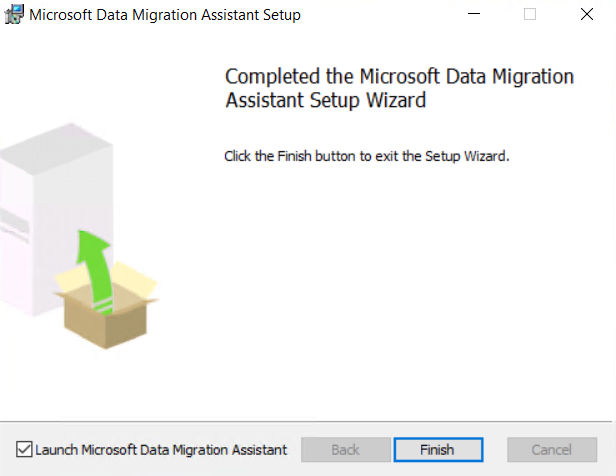
The Data Migration Assistant can be downloaded from Microsoft
Download center and installed to your machine, using a straight-forward installation wizard, as shown below:
Once installed to your machine, you need to be a member of the sysadmin fixed SQL Server role in order to use that
tool.
The Data Migration Assistant provides you with the ability to configure the number of databases to assess in
parallel, Number of databases to migrate in parallel and the SQL connection timeout from the dba.exe.config
configuration file before start using that tool. In this demo, we will use the default values for assessing and
migrating without changes.
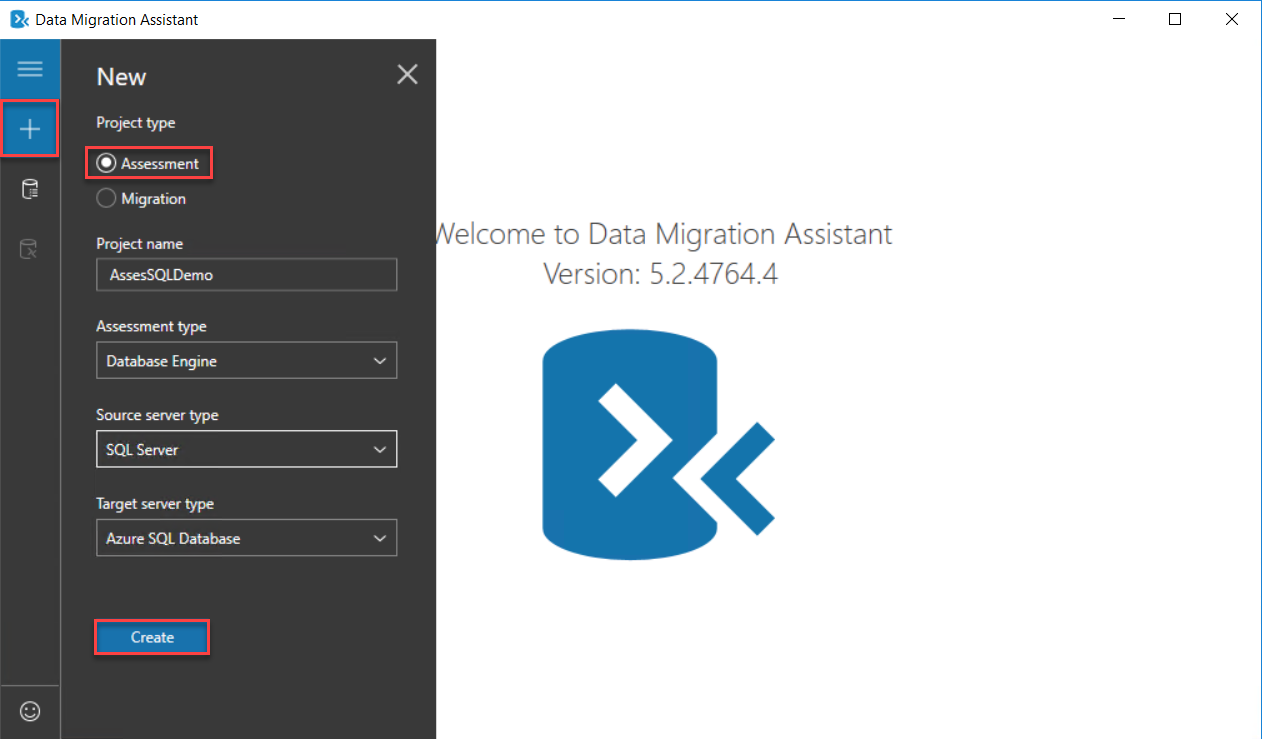
When you start the Data Migration Assistant, click on the (+) icon to create a new assessment project to check any
blockers, unsupported features or recommendations before migrating your databases from on-premises site to Microsoft
Azure SQL Database. You need to provide a meaningful name for the project, the type of assessment, source and
destination data platforms, as shown below:
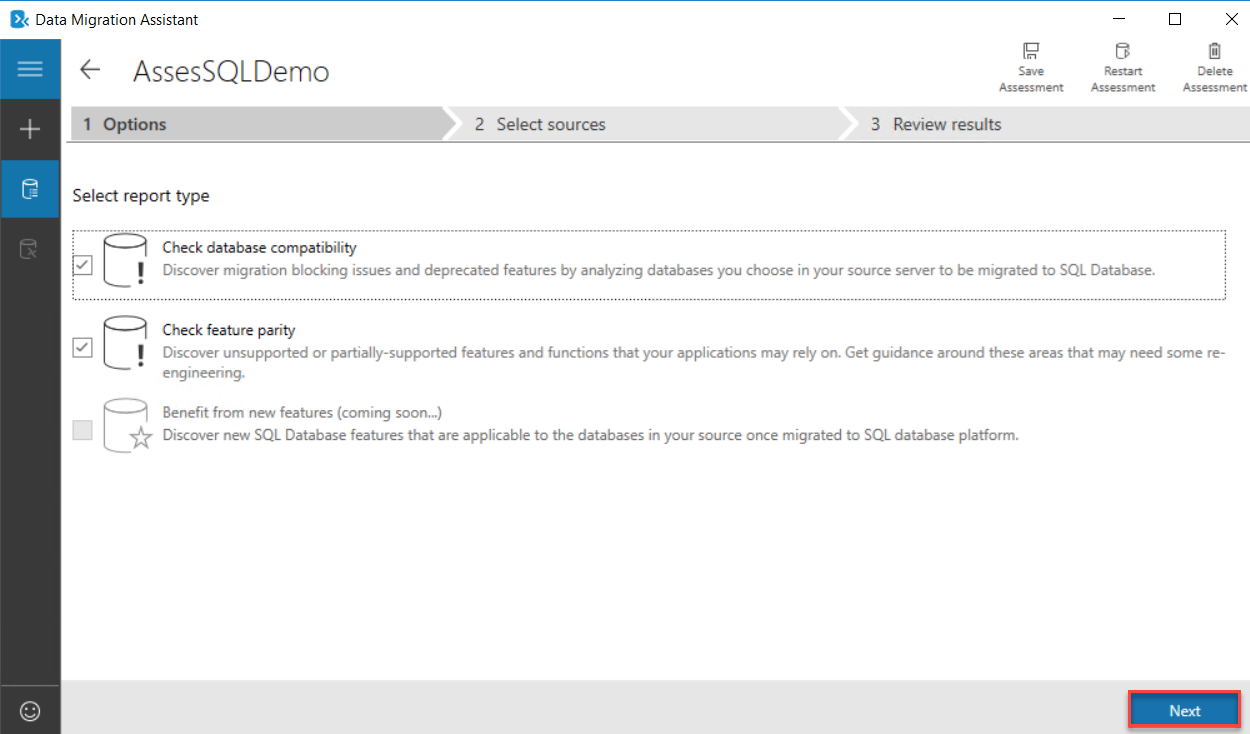
In the project configuration window, specify what will be assessed in the source databases, such as any
compatibility issue or unsupported features that may block the migration process, as shown below:
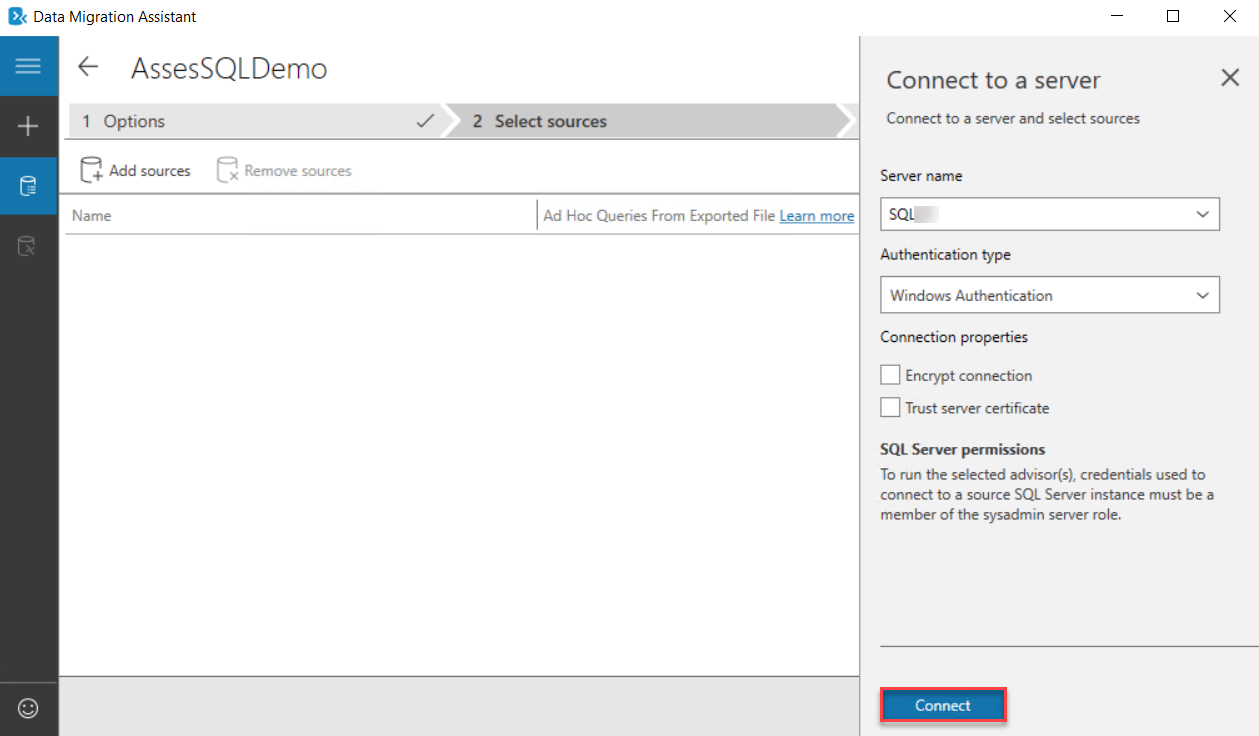
After that, you will be asked to provide the SQL Server name and the credentials that will be used to connect to
that SQL Server instance, as below:
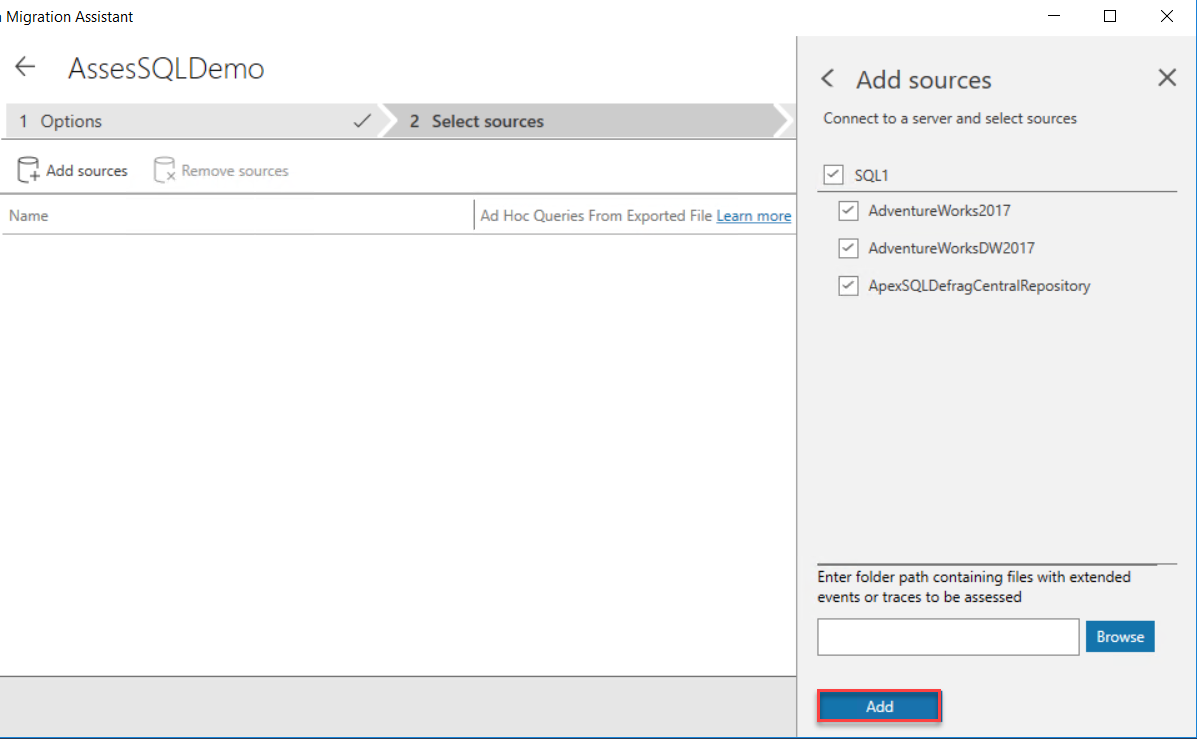
Once connected, all user databases hosted under that instance will be listed, providing you with the ability to
choose the databases that will be assessed before migrating it to Microsoft Azure SQL Database, as shown below:
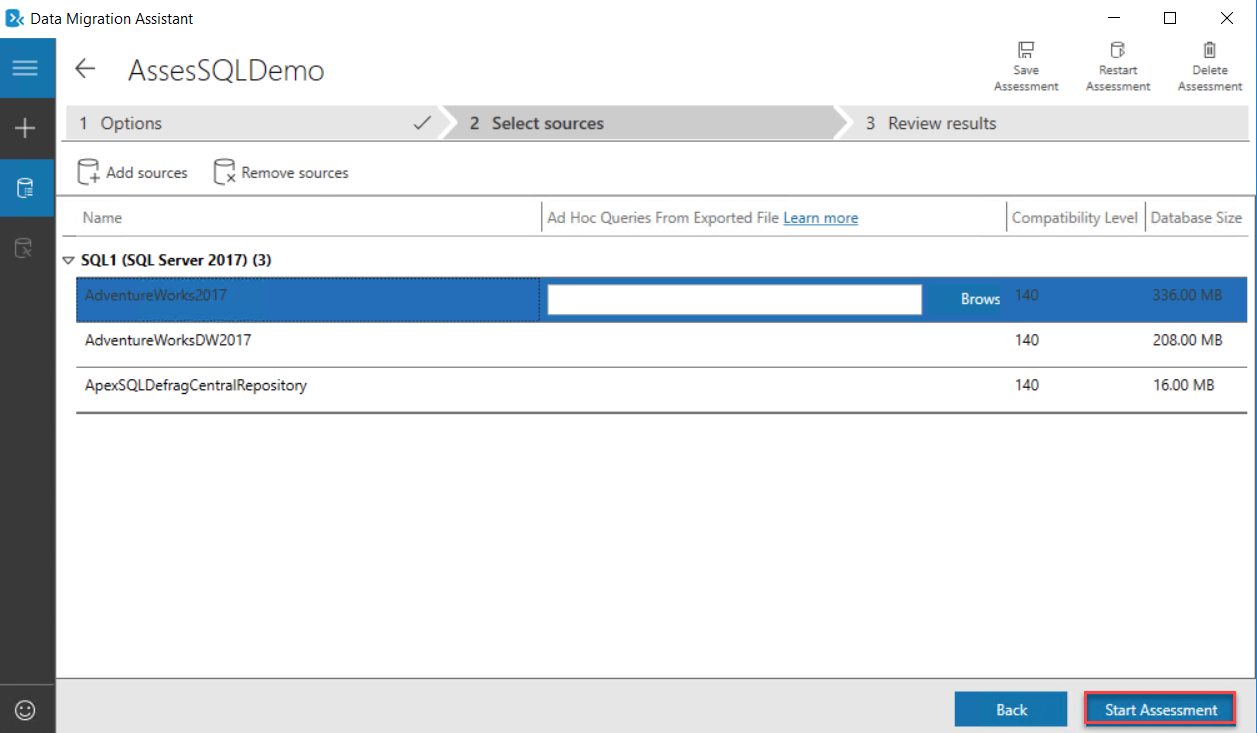
Now the databases are ready for the assessment. Click on the Start Assessment option to assess the
databases in the selected list, as shown below:
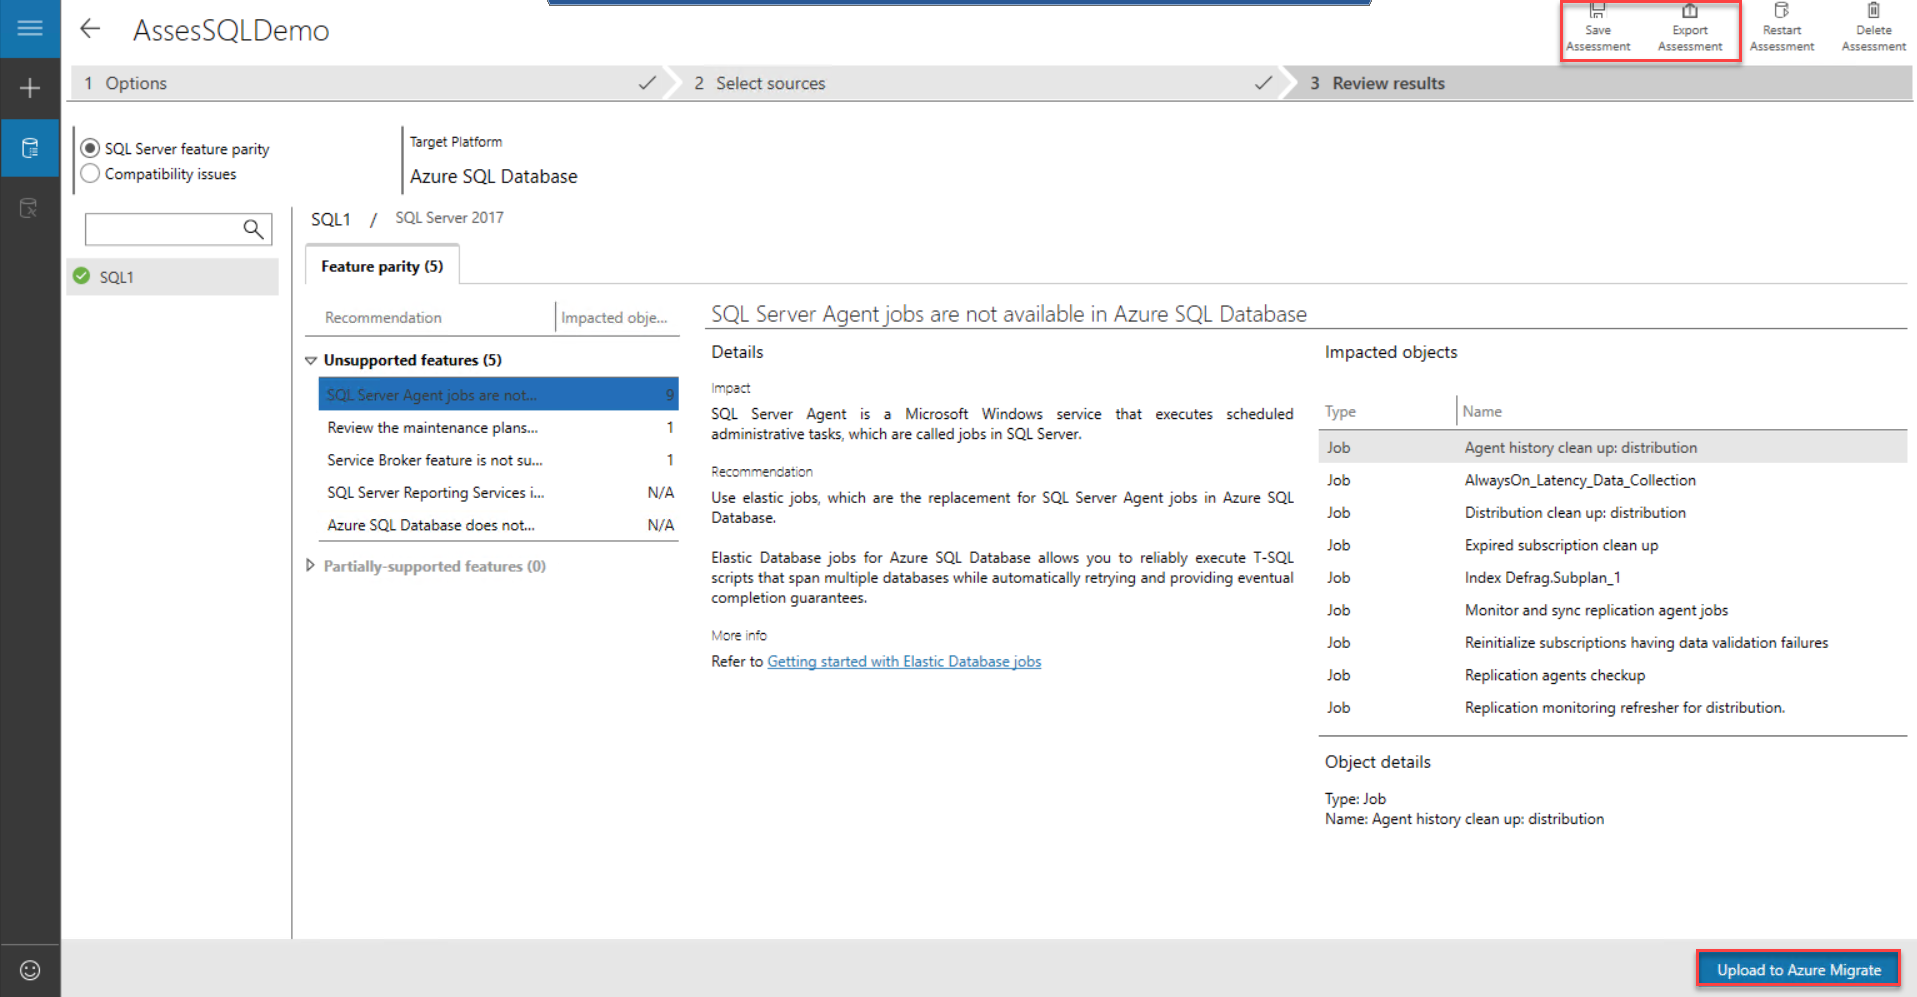
Once the assessment process completed successfully, review the list of breaking points and unsupported features that
are provided by the Data Migration Assistant, with the ability to save the assessment result, export it or upload it
to Azure Migrate tool, as shown below:
Azure Database Migration Service
The Azure Database Migrate service provides you with the ability to perform online or offline database migration
from a large scale of database sources, such as SQL Server, MySQL, Oracle, DB2, MongoDB and PostgreSQL, to Microsoft
Azure Data platform using the Azure Portal and with the minimal downtime.
Internally, the Azure Database Migrate service uses the Database Migration Assistant tool to generate the assessment
reports, providing all changes required before starting the migration process.
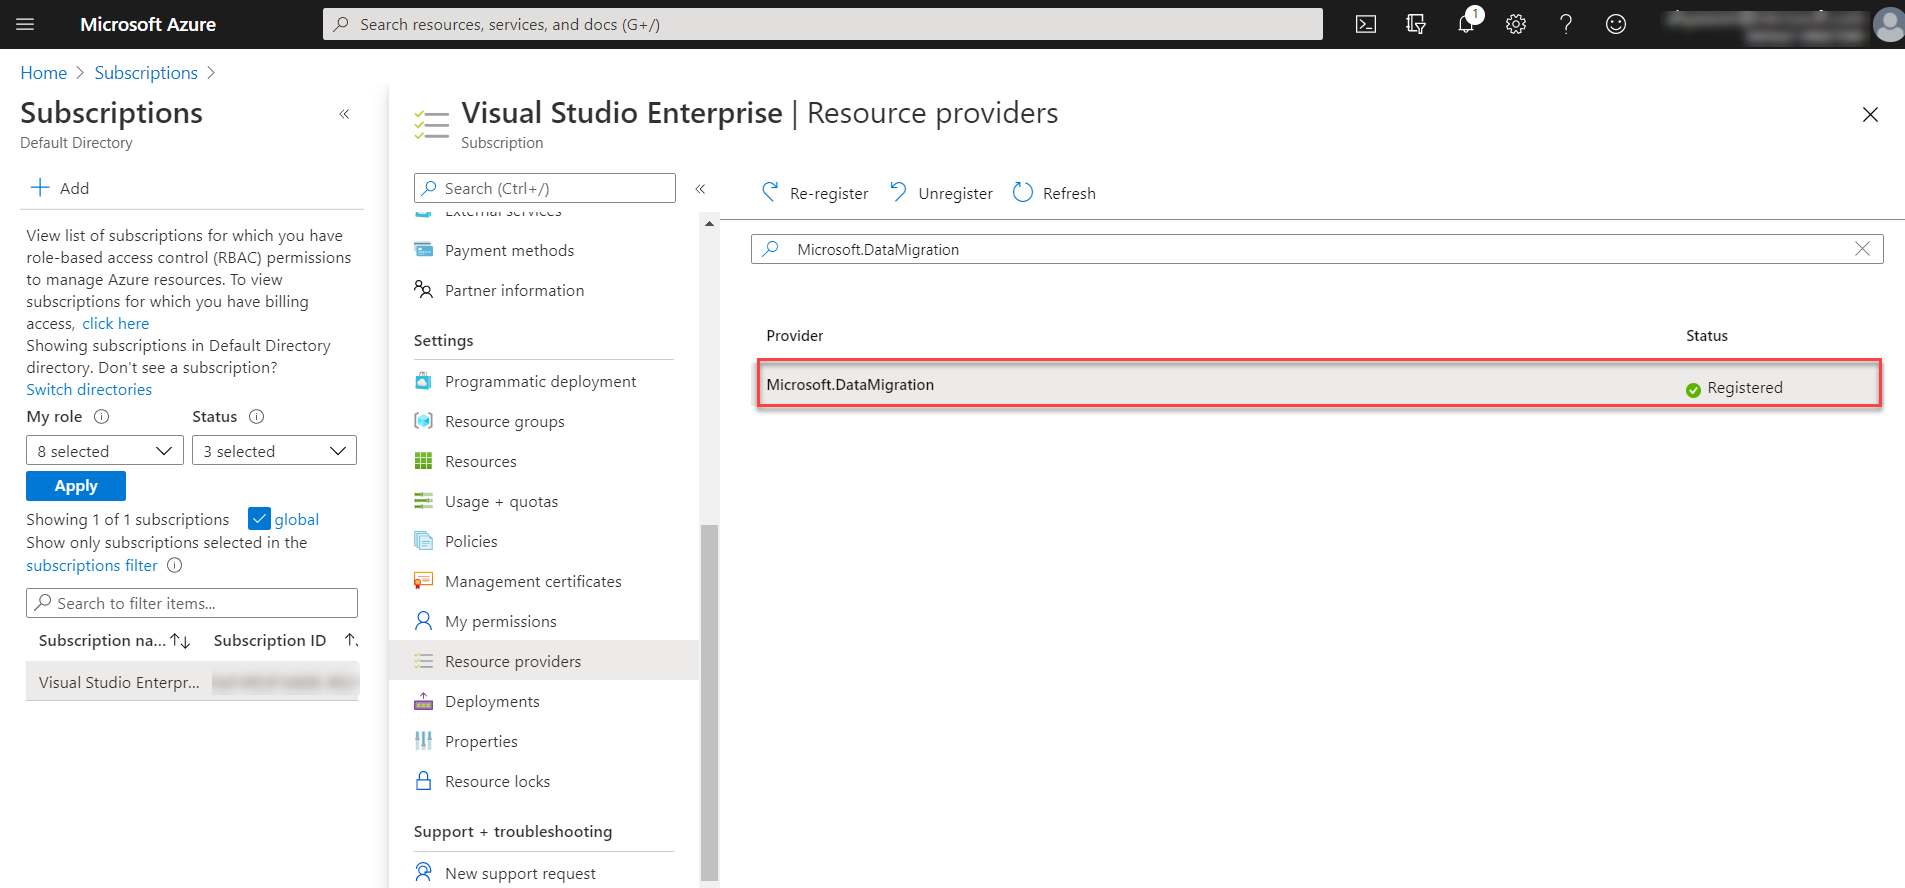
Before creating a new Azure Database Migration Service instance and use it to migrate the databases to Microsoft
Azure, we should register the Microsoft.DataMigration resource provider.
This can be performed by opening the Azure portal and browsing the subscription under which we plan to create the
Azure Database Migration Instance. From the selected subscription move to the Resources Providers option and search
for Microsoft.DataMigration resource provider and register it. Once it is registered, the status will be changed to
Registered, as shown below:
Now we are ready to create a new instance of Azure Database Migration Service.
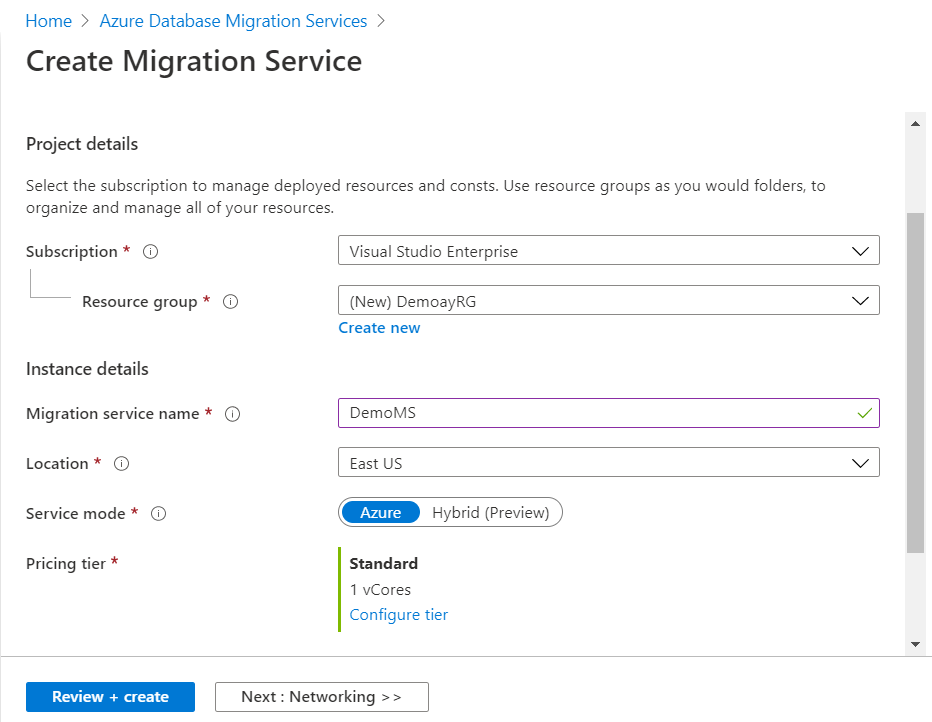
From the Azure portal, search for Azure Database Migration Service under All Services and click (+ Add) to create a
new instance. In the Create Migration Service window, provide the Resource Group name where the
instance will be created, or create a new resource group, choose a unique meaningful name for the migration service,
choose the nearest region for you then click Next to move to the Networking configurations, as shown below:
From the Networking configuration page, provide the name of your VNET where the migration service will be created,
or provide a new name to create that VNET. The VNET is required for the Azure Database Migration Service to provide
it with access to the source database and target environment. After providing all the required information, click
Review + Create to proceed with the migration service creation, as below:

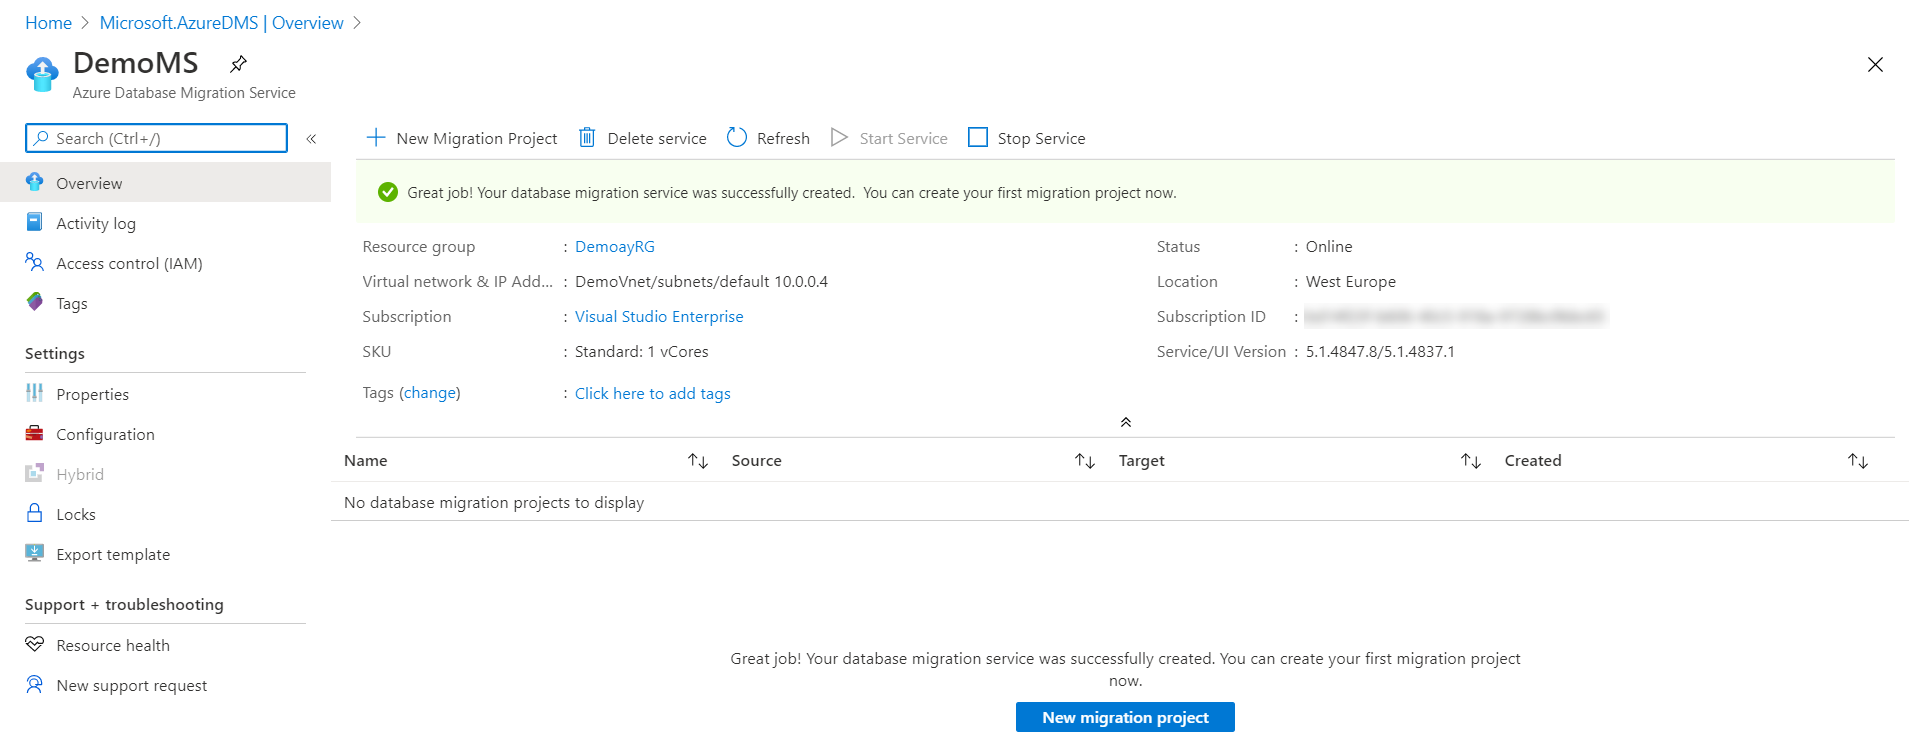
Within a few minutes, the Azure Database Migration Service will be created successfully and ready for a new
migration project, as shown below:
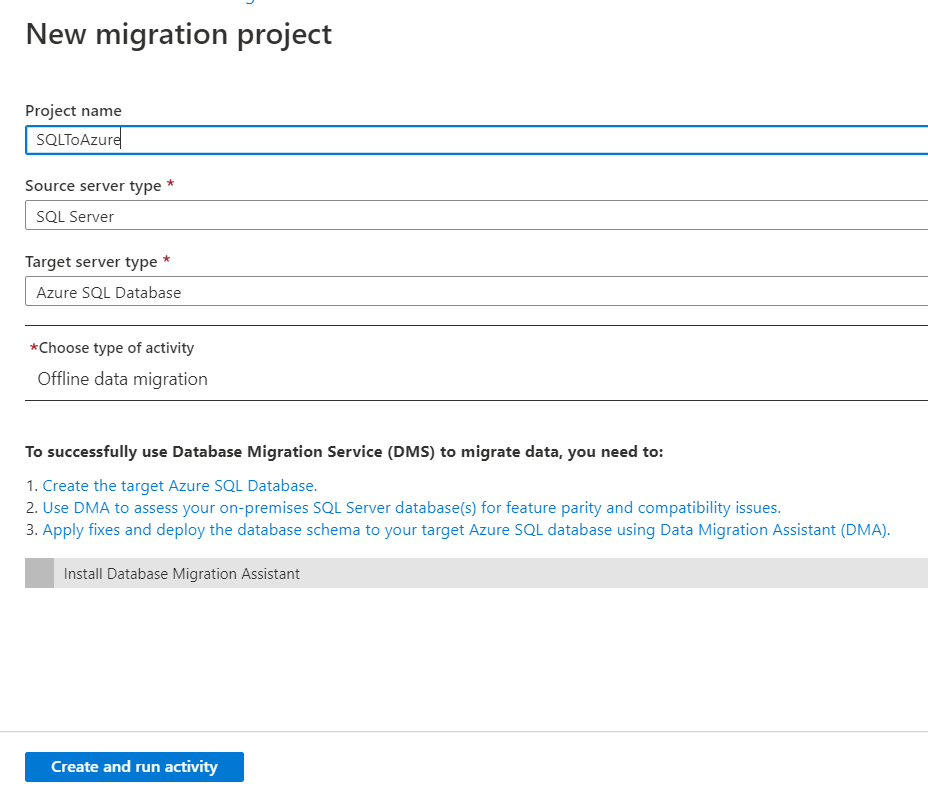
To create a new migration project, click on the New Migration Project option, from the Azure Database Migration Service, as shown below:

From the New Migration Project window, provide a unique meaningful name for the project, the source and destination
database platform type. You can see that the Azure Database Migration Service provides you with some points that
should be performed before migrating the databases. This includes creating the destination database on Azure,
assessing the database using DMA tool as we performed previously and fix the issues detected by the DMA then migrate
the schema using the DMA tool, as shown below:
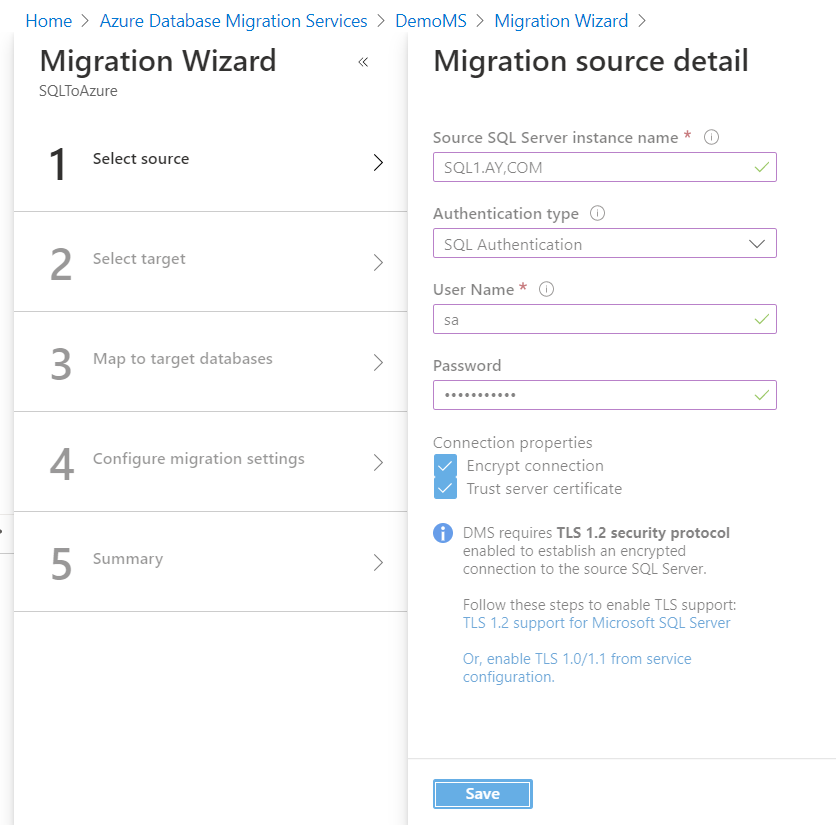
When you create the migration project, it will move you to the migration wizard and ask you to provide the required
information to connect to the source database, the destination database, map the source database with the
destination one and select the list of tables to be migrated, as shown below:
Please note that you should perform some configurations from both the source and destination database servers in
order to allow the Azure Database Migration Service to access these databases. For more information about the
migration process using Azure Database Migration Service, check Tutorial: Migrate SQL Server to Azure SQL Database offline using DMS.
We will not go through the migration wizard deeply for now as we will perform a complete database migration process
later in the next articles of this series.
Azure Migrate Service
The Azure Migrate Service is a comprehensive tool that can be used to assess and migrate on-premises virtual
machines with its infrastructure, applications, and database to Microsoft Azure. It provides a recommendation for
the size of the destination Azure Virtual machine to migrate to and the estimated monthly cost for running your
virtual machine in Azure. If you are fine with the provided recommendation, Azure Migrate Service will migrate your
virtual machine to Azure with high confidence.
The Azure Migrate Service consists of multiple built-in tools. This include, the Server Assessment tool that is used
to discover and assess on-premises VMS, Server Migration that is used to migrate the VM servers, Data Migration
Assistant used to identify any migration blocking issue, Azure Database Migration Service that migrates on-premises
databases to Microsoft Azure Database platform, Web App Migration Assistant used to assess on-premises websites and
Azure Data Box that is used to migrate large amounts of offline data to Microsoft Azure.
To use the Azure Migrate Service tool to migrate your databases form On-premises to Microsoft Azure. Search for the
Azure Migrate in Azure Portal and choose Assess and Migrate Databases options, as shown below:

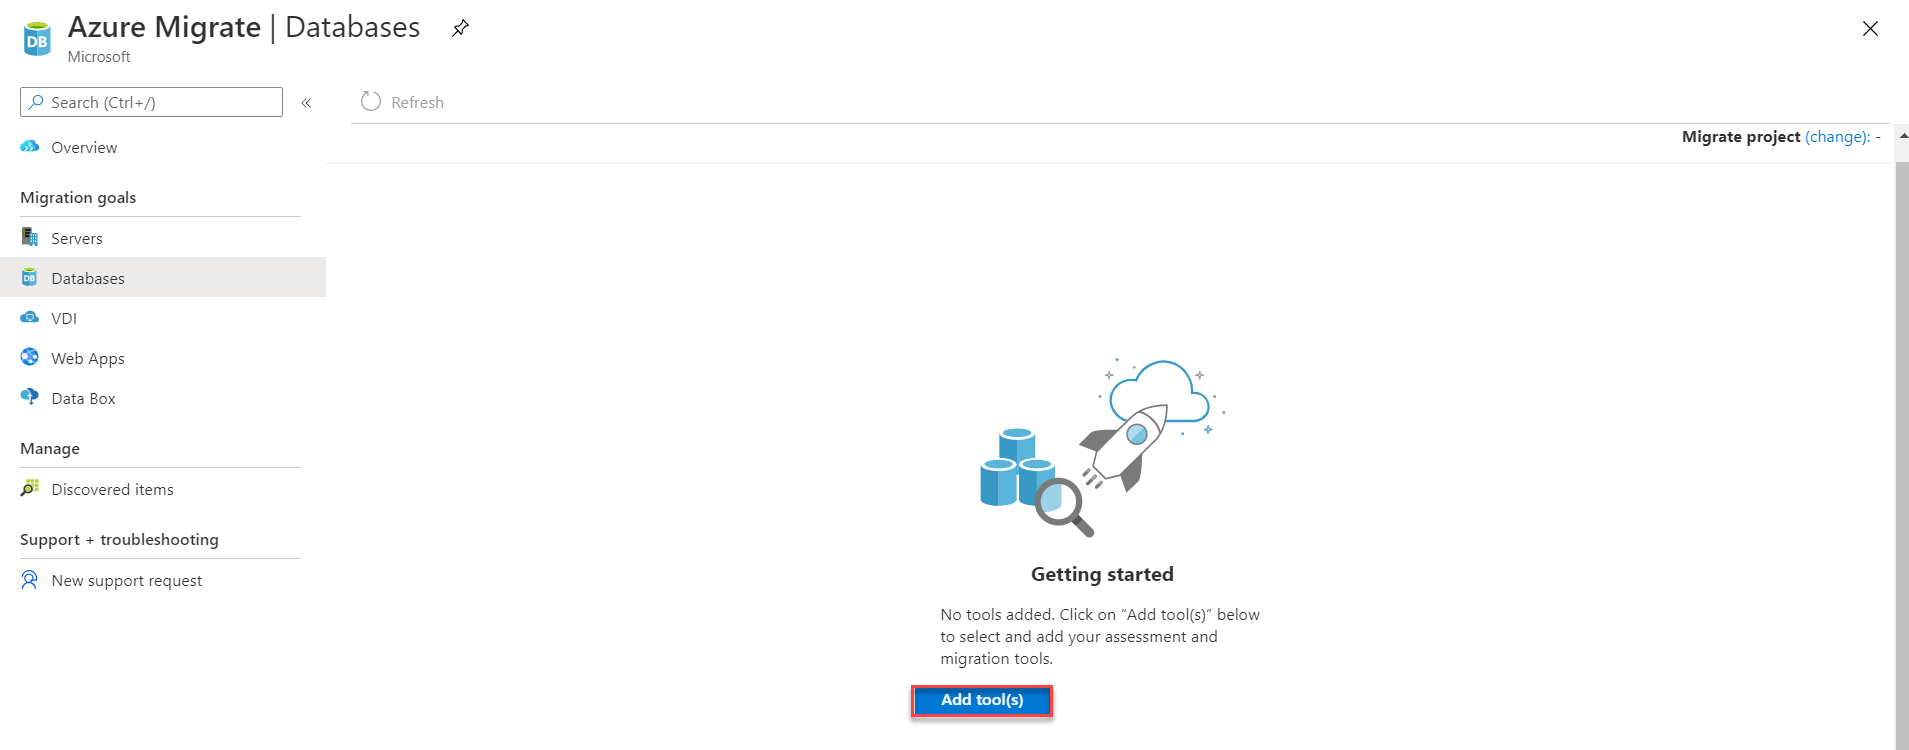
From the Azure Migrate: Databases window, click on Add tool(s) option to select the tools that will
be used to assess and migrate the databases, as below:
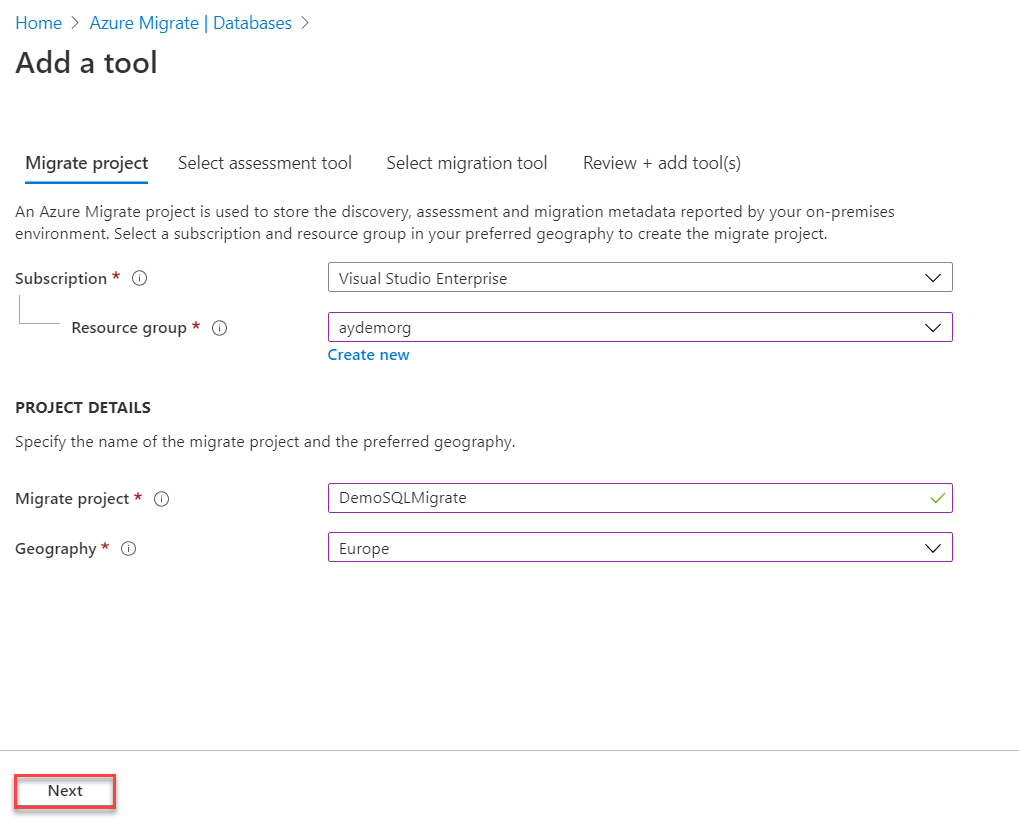
In the Migrate Project section of the Add a Tool window, provide the subscription under which the project will be
created, the resource group name, a unique name for the project and the nearest geography where this project will be
created, then click Next to continue:
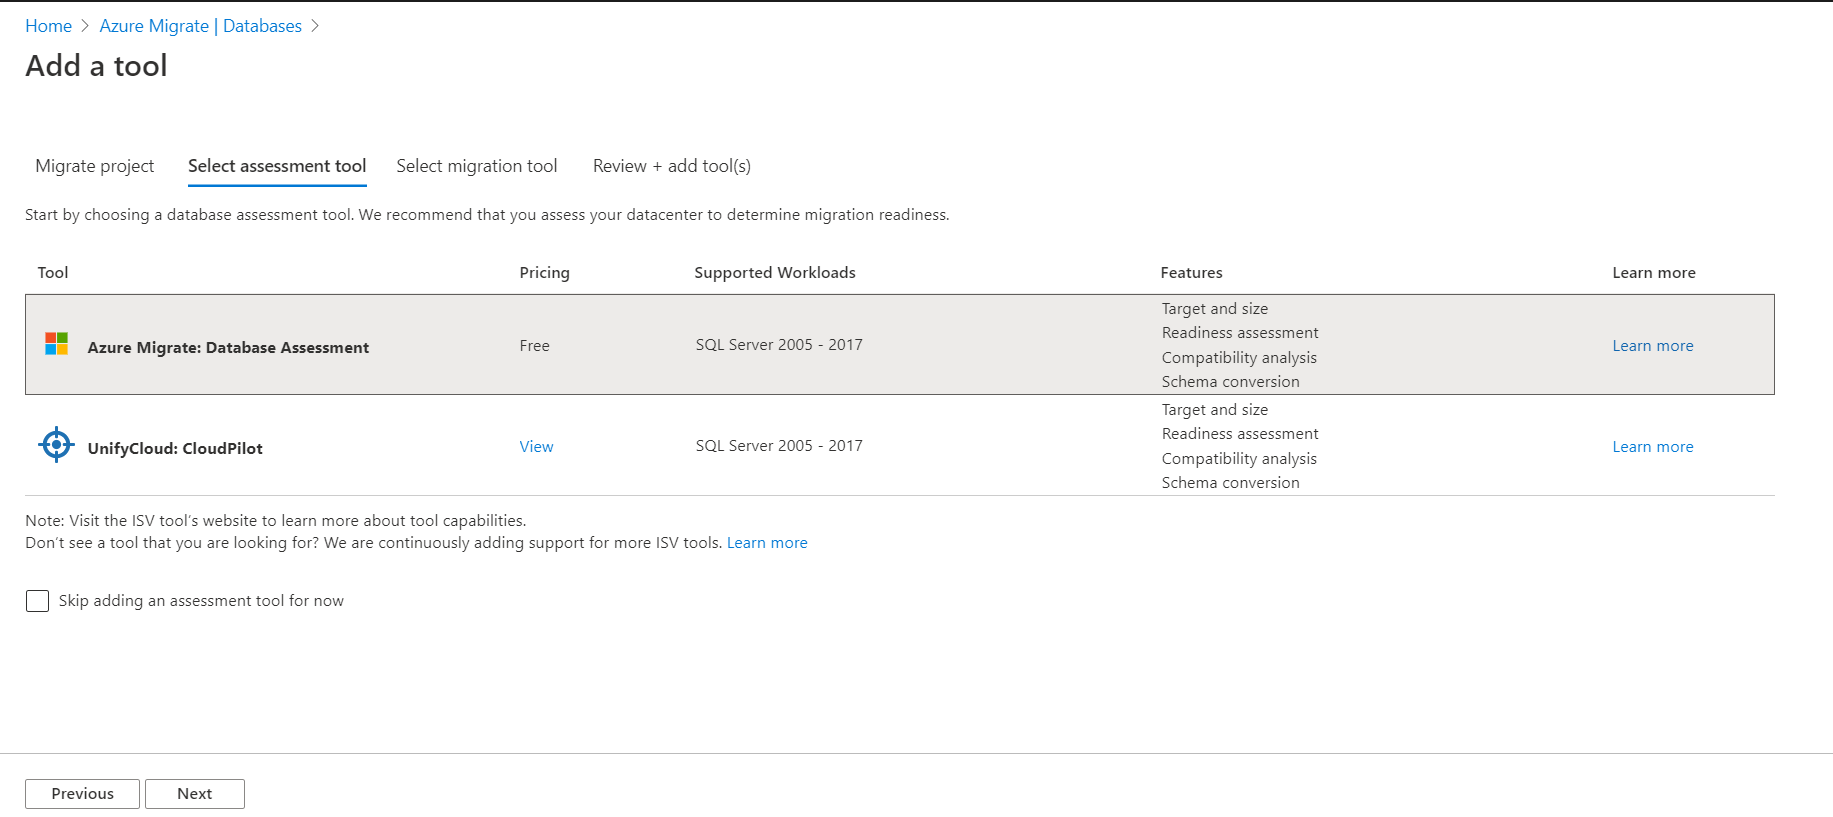
After that, you will be asked to select the tools that will be used to assess the databases before migrating it to Azure, as below:
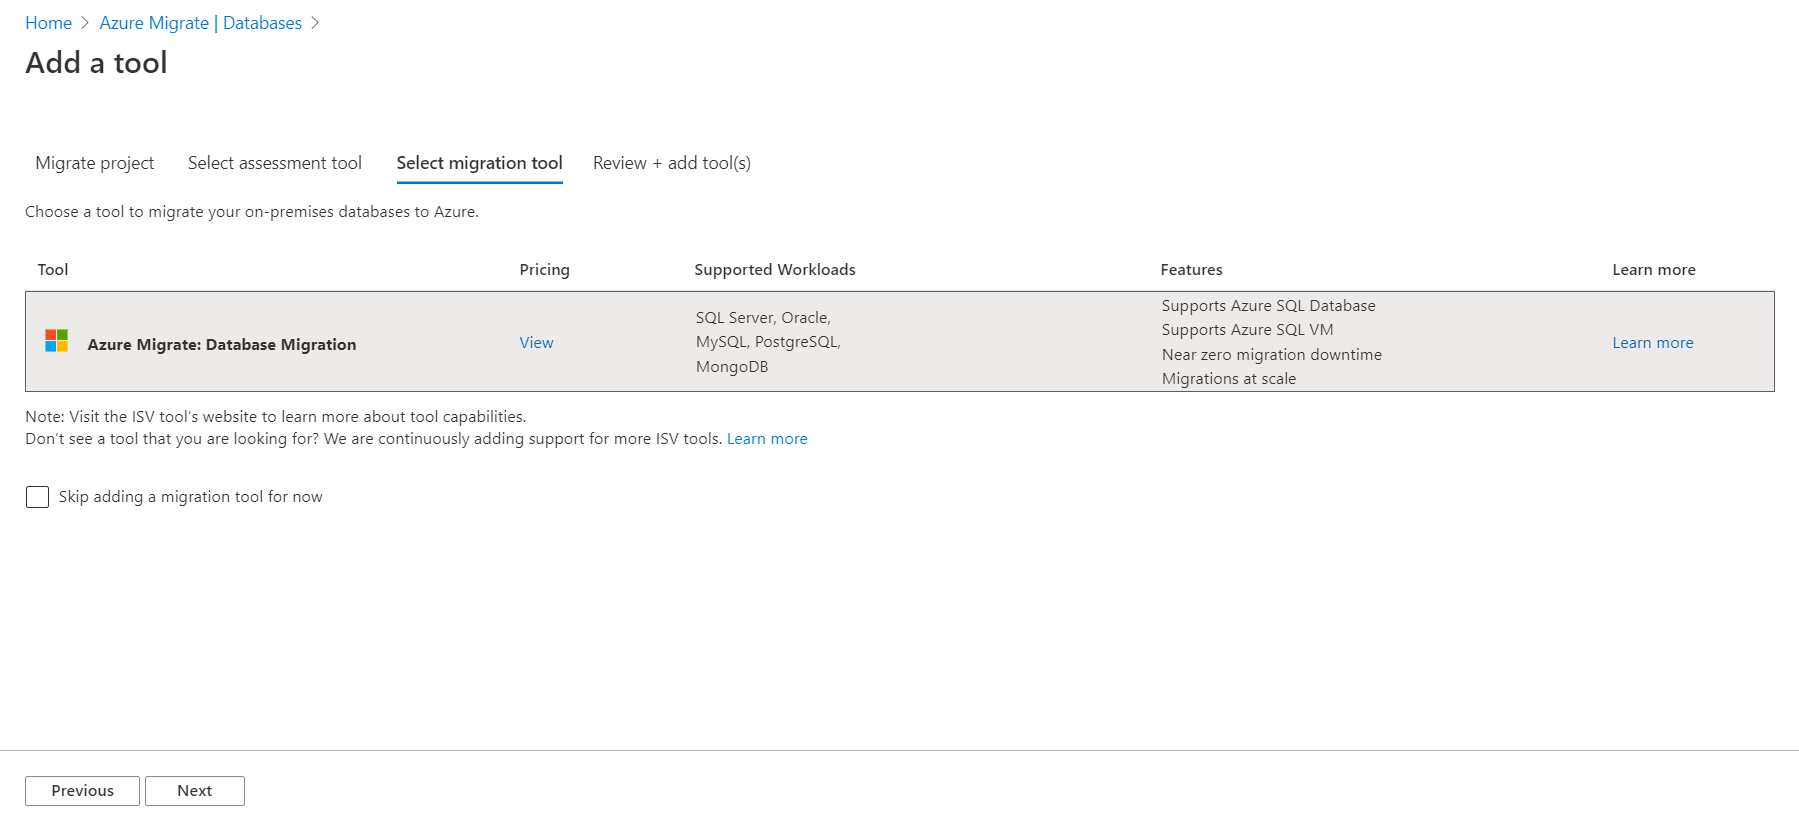
Then you need to select the tool that will be used to migrate the databases to Azure, as follows:
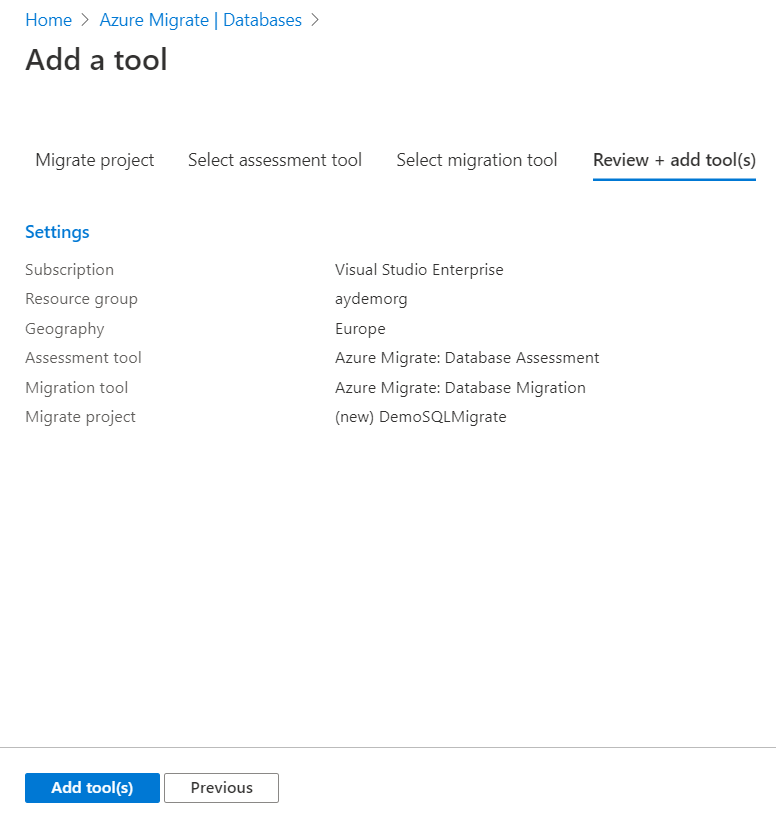
Finally, review your selections before creating the project, then click Add Tool(s) to configure
the assessment and migration project, as below:
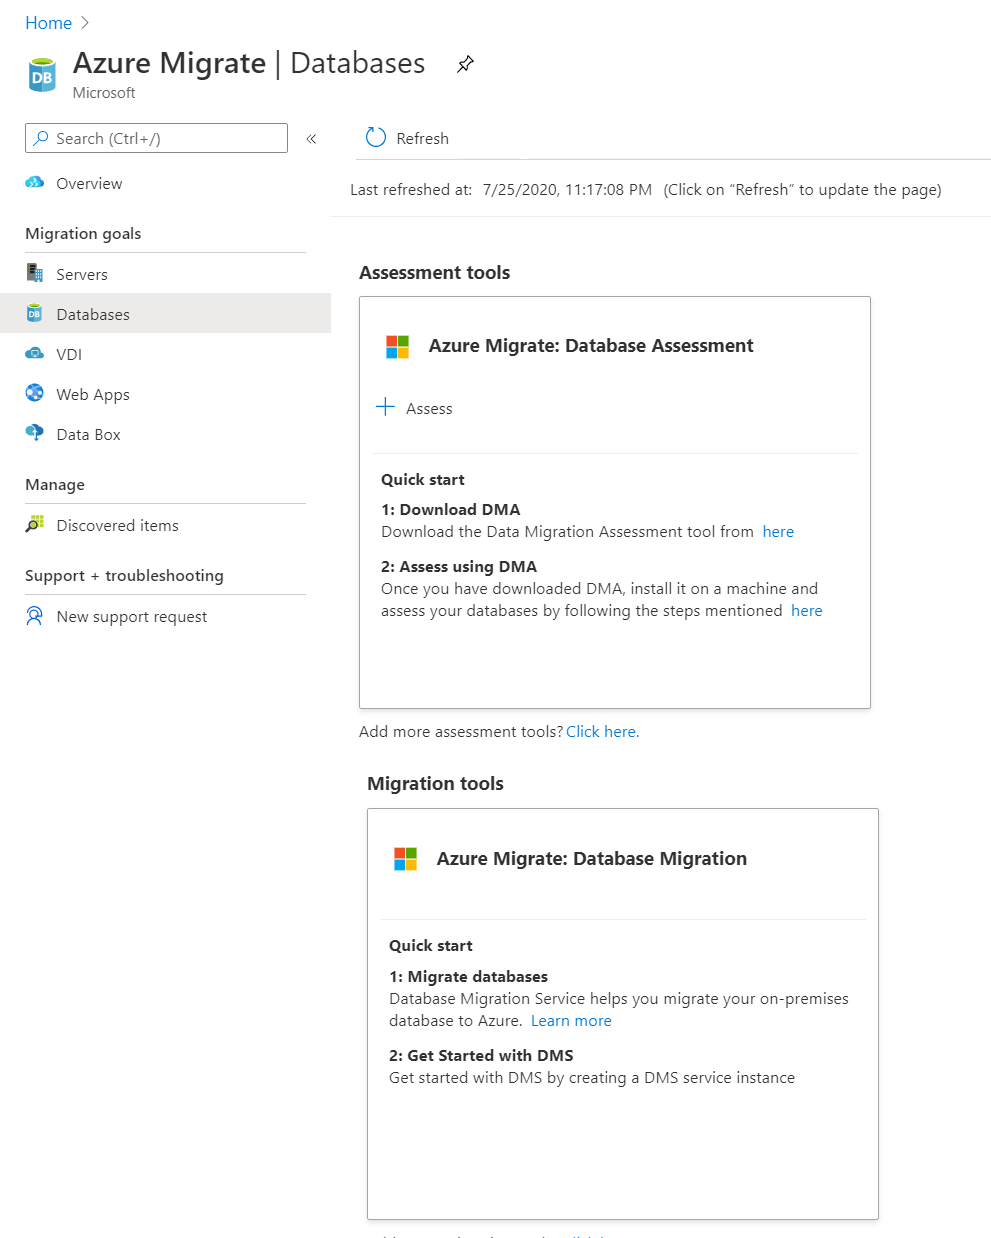
In the created project, Azure Migrate Service will provide you with guidance steps and links for using the selected
tools to assess and migrate the databases to Azure, as below:
Conclusion
In this article, we went through a number of useful tools that can help in assessing and migrating the SQL workload to Microsoft Azure database services. In the next article, we will discuss how to migrate the SQL workload to a SQL Server instance hosted on an Azure VM. Stay tuned!
Table of contents
Ahmad Yaseen is a Microsoft Big Data engineer with deep knowledge and experience in SQL BI, SQL Server Database Administration and Development fields.
He is a Microsoft Certified Solution Expert in Data Management and Analytics, Microsoft Certified Solution Associate in SQL Database Administration and Development, Azure Developer Associate and Microsoft Certified Trainer.
Also, he is contributing with his SQL tips in many blogs.
Latest posts by Ahmad Yaseen
(see all)
SQL
via SQL Shack – articles about database auditing, server performance, data recovery, and more https://ift.tt/2nZ7eJ9
July 31, 2020 at 11:32AM
Ahmad Yaseen
